RTX 5070 and RTX 5060 Ti Simple Undervolt and Advanced Setting with MSI Afterburner Part 2
Graphics Cards
Welcome back to our guide on tuning your RTX 50-series graphics card! In Part 1, we covered the basics of overclocking, set up MSI Afterburner and went over its interface elements, and overclocked our RTX 5060 Ti using a variety of methods.
While overclocking is the best way to maximize raw performance, there's another side to GPU tuning that is just as powerful: undervolting. It’s the quest to get the same – or even slightly better – performance than stock (factory settings), but with your GPU running significantly cooler, quieter, and consuming less electricity.
That's the magic of undervolting.
It’s the art of finding the lowest stable voltage your GPU needs to maintain a target clock speed, dramatically improving its efficiency.
This guide is split into two paths. If you're looking for a quick and easy way to lower your GPU's temperature and power draw, you can follow the Simple Undervolt section for a straightforward method that delivers excellent results. This method does sacrifice some performance to save power and lower temperatures.
However, if you're ready to take full control and fine-tune your card for the absolute perfect balance of performance and efficiency, we’ll dive into Advanced Tuning using the Voltage-Frequency (VF) Curve Editor.
IMPORTANT: Before you proceed to the advanced tuning section, it is essential that you have read Part 1 of this series. The first guide explains critical concepts like the "silicon lottery", walks you through the MSI Afterburner interface, and covers the initial setup required for tuning.
- The Simple Undervolt: Scaling Back Power Limits to Save Power and Reduce Temperatures
- Advanced Tuning: Dialing in an Undervolt Using the Afterburner Curve Editor
- Advanced Undervolt Strategy #1: Default Clocks, Lower Voltage
- Advanced Undervolting Strategy #2: Much Lower Voltage, Much Reduced Frequency
- Apply at Windows Startup: Balancing Convenience and Stability
- Overclocking or Undervolting or a Bit of Both: Take Your Pick
- Overclocking Basics: The Key Terms You Need to Know
- Setting up MSI Afterburner: Interface, Settings, and More
- A Simple First ‘Overclock’: Power and Voltage Limit Tuning
- Manual Overclocking: Advanced Tweaking
- Stability Testing: It’s Time to Test
The Simple Undervolt: Scaling Back Power Limits to Save Power and Reduce Temperatures
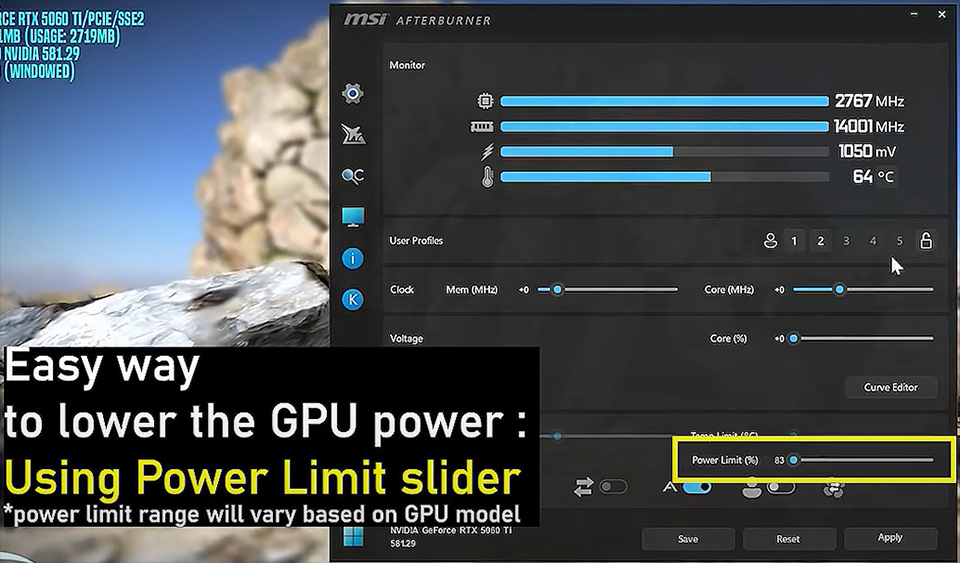
If your main goal is to reduce your GPU's temperature, fan noise, and power consumption without too much tinkering, then a simple undervolt using the Power Limit slider is the perfect place to start.
This method is incredibly straightforward and gives you exactly what you need with just a single tweak – at the cost of some performance, of course.
We’re basically limiting the GPU to a lower power budget. In response, the card will automatically find the lowest stable voltage to maintain the best possible clock speed within this new limit.
- Start Your Benchmark: Just like before, get MSI Kombustor or a demanding game running so you can see the impact of your changes in real-time. Let it run for a minute to get a baseline reading of your default temperatures and clock speeds.
- Locate the Power Limit Slider: Find the Power Limit (%) slider in the main Afterburner window.
- Reduce the Power Limit: Unlike overclocking, you will now drag this slider to the left. A good starting point is around 85% or 80%. The lowest limit available to you will vary from GPU to GPU. For our RTX 5060 Ti, we’ve settled on 83%.
- Apply the Settings: Click the Apply button to confirm the change.
As soon as you apply the new, lower power limit, you’ll see your GPU's voltage, clock, and power consumption change instantly on the OSD. The GPU's internal logic automatically reduces its voltage and clock speed to stay within your new power budget.
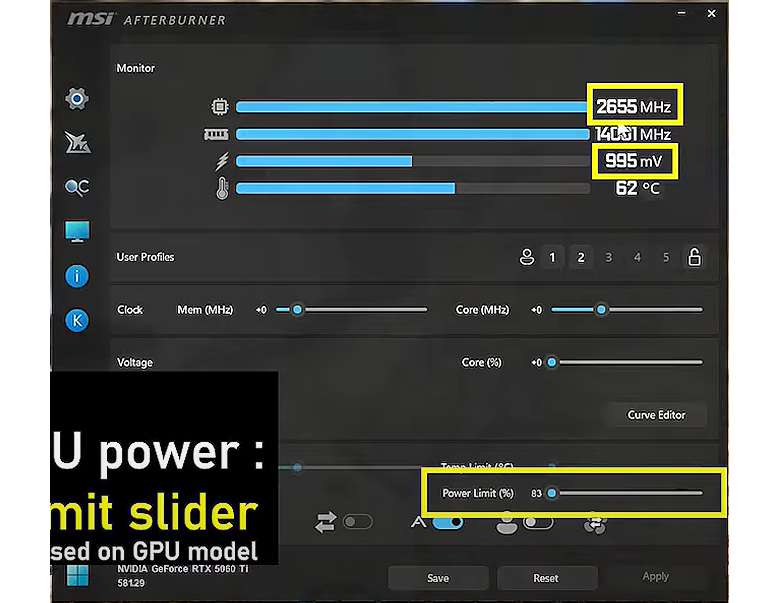
That’s it! You’ve achieved an undervolt by just limiting how much power your graphics card can draw.
Advanced Tuning: Dialing in an Undervolt Using the Afterburner Curve Editor
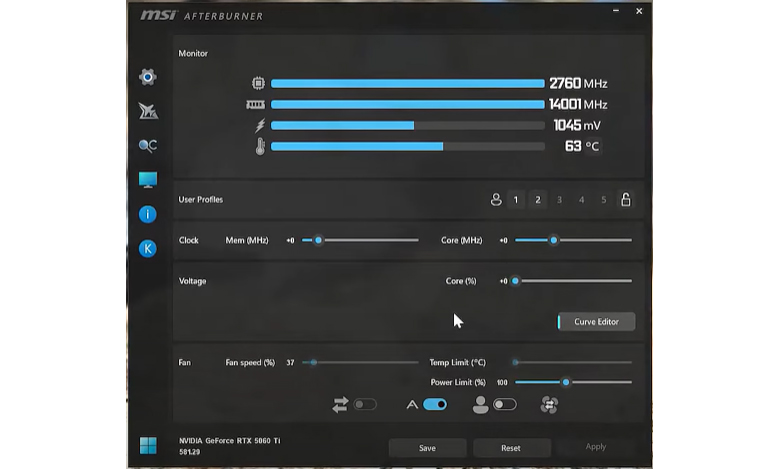
So, scaling back the power limit did the trick, but it doesn’t feel very satisfying if you want to find the ideal spot for an undervolt yourself. Let’s set the Power Limit back to “100%” and try another, more advanced method.
Note: Just to reiterate, please go over Part 1 of this series if you haven’t read through it already before following this section. It’ll give you some important information and context about the Afterburner interface and the terms used here.
Now, you’ll see a button called ‘Curve Editor’ under the Core Voltage slider in your MSI Afterburner interface.
Click the button and a Voltage/Frequency Curve Editor should open in a small, separate window.
In this curve, look for the dot aligning with your default target clock and voltage. In our case, we’re looking for around 2.8GHz at 1.05V. Remember, these values will vary from GPU to GPU.
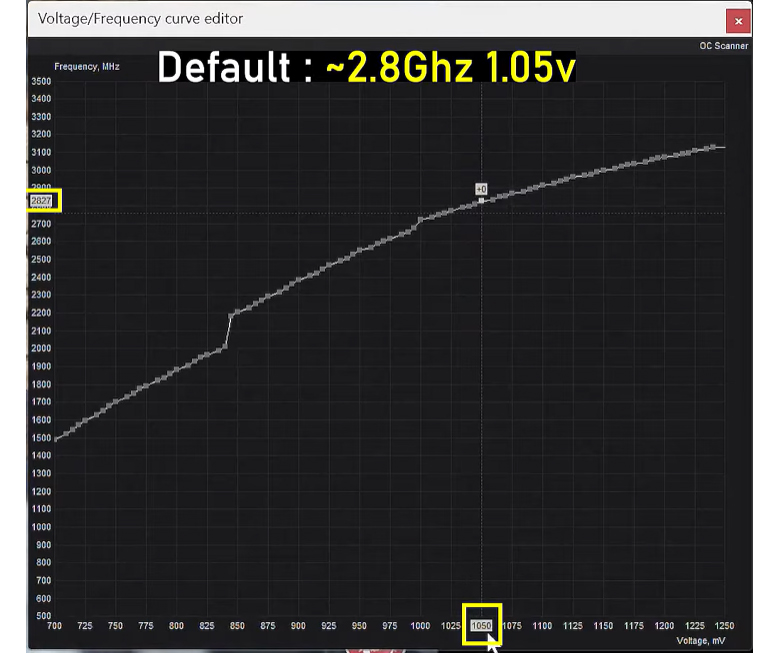
Once you’ve found your default target on the curve, it’s time to tell your GPU to use a lower point on this curve instead of this one to save power and lower temperatures. For the purposes on this tutorial, we’ll be going with 950mV.
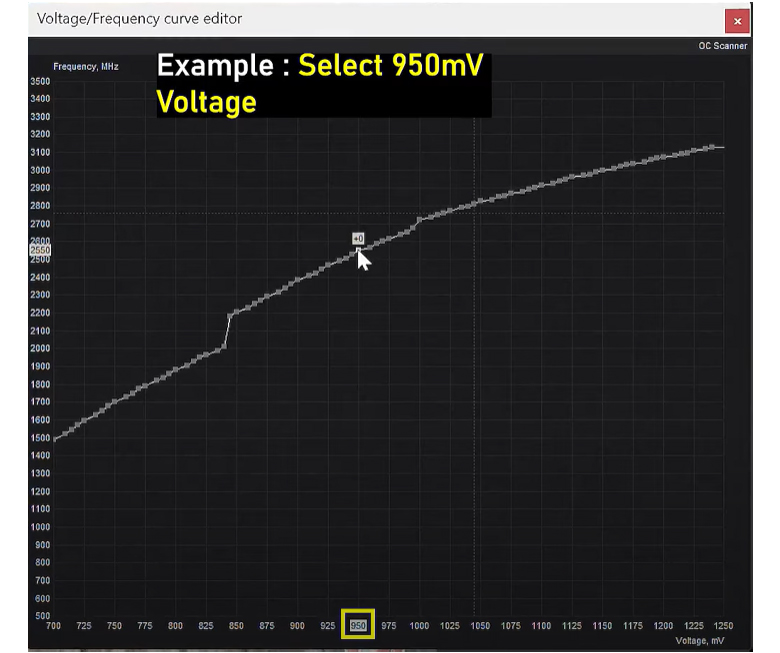
You’ll notice that this lower voltage also corresponds to a lower clock speed (on the left). That’s expected when we’re using the default V-F Curve.
- Click this lower point on the curve (950mV for us) to select it.
- Press ‘L’ on your keyboard twice to lock it.
- Click Apply
If you’ve followed this step correctly, your curve editor will now show a dotted horizontal line through the newer, lower point on the curve that you picked. You’ll also see that both your GPU clock and voltage drop once you hit Apply.
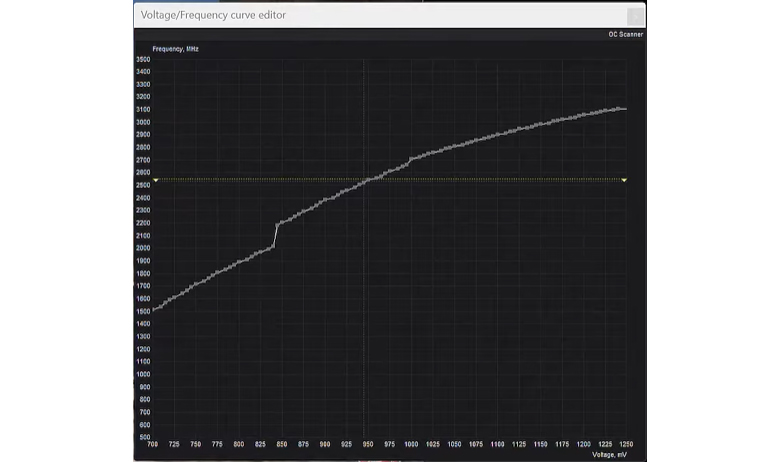
This method should give you a better undervolt than our simple Power Limit method above. But again, you do lose performance with this method as your clock speeds will scale down according to the default curve.
Advanced Undervolt Strategy #1: Default Clocks, Lower Voltage
This undervolting strategy basically maximizes performance and tries to get default GPU clock speeds while also running at lower voltages. So, let’s get started.
Remember to reset all your settings to default by hitting the ‘Reset’ button if you’ve made any changes as you followed the tutorial.
- Open the Afterburner V-F Curve Editor.
- Find and note down your default GPU clock speed and voltages; in our example, we’re looking for around 2.8GHz at around 1.05V.
- Look for a point on the curve that aligns with a lower voltage, say, 950mV.
- Click this 950mV point.
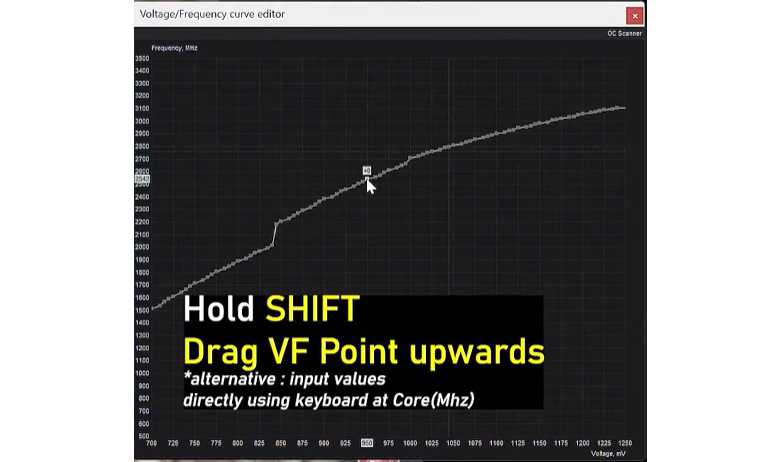
- Now, click and hold ‘Shift’ and drag your selected VF point upwards until this 950mV point aligns with your default GPU clock (2.8GHz).
- Stop dragging once you see 2.8GHz (or your default clock speed) highlighted on the Y-Axis of the curve editor.
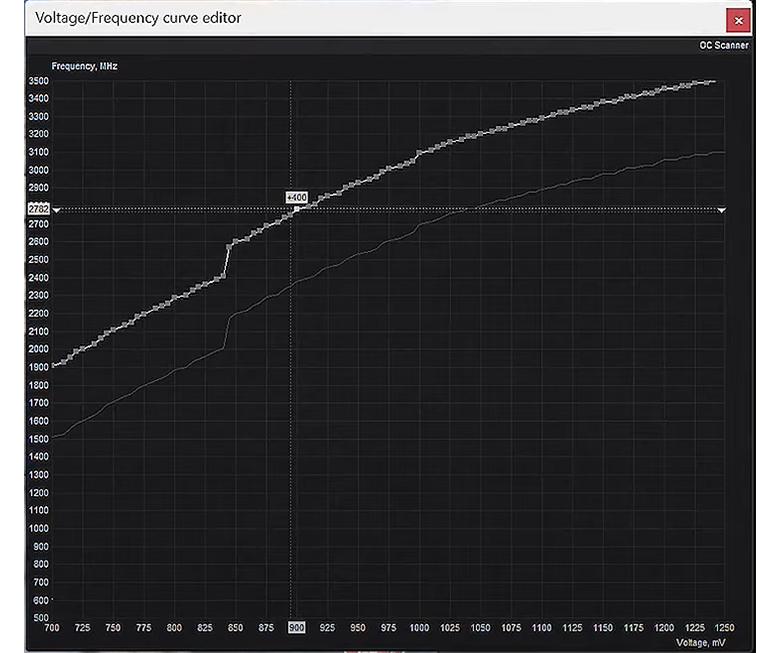
- Like we did previously, hit ‘L’ twice to lock this new point in place.
- You should see a horizontal dotted line through this new point if you’ve followed all the steps above perfectly.
A quick look at the Afterburner interface will show your GPU running at your original clock speed but using a lower voltage. Repeat the above steps for even lower voltages until your Kombustor crashes or you see other signs of system instability. It’s recommended to reduce voltage by either 25mV or 50mV steps to track stability a little better.
By repeating this step a few times, we found that 900mV was the lowest we could go without crashing at this clock speed. So, let’s lock the last stable setting that you get and continue on to stability testing (covered in Part 1 of this series).
Advanced Undervolting Strategy #2: Much Lower Voltage, Much Reduced Frequency
While Strategy #1 gives you back your default, out-of-the-box performance at lower voltages (less power), it usually won’t save you too much power. If you’re okay with taking a bit of a performance hit, you can go with Strategy #2 to cut power consumption even more.
Here, we’ll be aggressively reducing the voltage to the GPU alongside lower clocks until we can find a stable combination. Again, remember that the values shown here may not match what you’re seeing depending on what GPU you’re using and what limits the manufacturer has placed on it.
So, let’s get started!
- Open the Curve Editor.
- Now, pick a lower voltage that you want to target. For our tuning, we’ve gone with 800mV.
- Our goal is to find the highest clock speed you can get at this voltage.
- Click the point corresponding to 800mV on the default curve.
- Note the Y-Axis at that lower voltage (Clock Speed).

- Hold down ‘Shift’ and drag the curve upwards and keep an eye on the white label showing the clock speed on the left. Move it up in steps of around 50MHz at a time.
- At each step, press ‘L’ twice to lock it in place and hit ‘Apply’.
- If you see any instability or crashing, back off from that clock speed by around 50-100MHz.
- In our undervolt, we could get to around 2.4GHz at 800mV without crashing.
Of course, you can tune your target voltage as low as you want, so feel free to experiment with the curve editor!
Apply at Windows Startup: Balancing Convenience and Stability
Now that you’re done tuning your GPU, you’ll want a way to apply these settings you’ve found without testing every time.

MSI Afterburner lets you save your tuning settings into profiles (the numbers above the Clock section of the app -> click a number, and hit ‘Save’ to save your current settings) so you can apply your settings with a single click.
The lock icon on the right locks these profiles, to avoid accidentally overwriting your settings.
Now, you’ll also find this icon on the bottom-left of the Afterburner window:
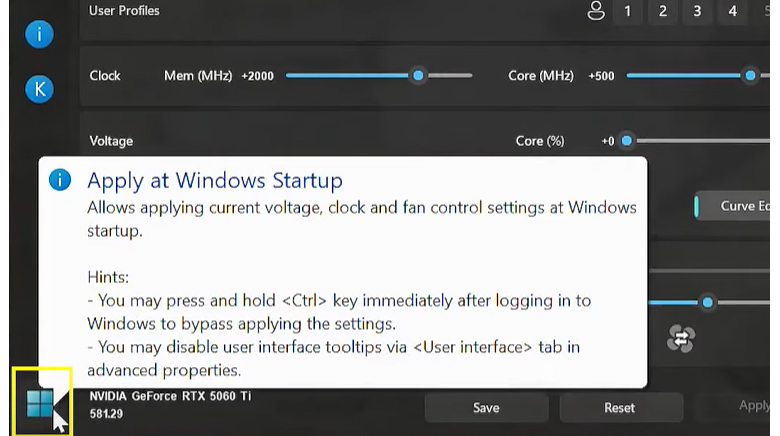
This button allows you to automatically apply your current settings at Windows Startup. Although this may seem convenient at first, it can become a hassle if your system isn’t 100% stable – resulting in boot loops and/or blue screens. To prevent these settings from applying, you can hold the ‘Ctrl’ key on your keyboard to bypass the settings.
Still, we’d recommend only using the ‘Apply at Windows Startup’ if you’re confident that the settings you picked are stable and have done extensive stability testing.
Overclocking or Undervolting or a Bit of Both: Take Your Pick
When deciding whether to overclock or undervolt your GPU, it’s important to start out with a specific goal in mind.
- Do you just want more performance?
- Do you want to reduce temperatures and power consumption and still enjoy default or close-to-default performance?
- Do you want to bring down power consumption significantly and run a cooler and quieter card, even at the cost of some performance?
Once you have an answer, you’ll know what path you should pick.
Follow our Overclocking Guide here or the Undervolting Guide above to tweak your GPU to your liking. If you want a video guide with a more comprehensive step-by-step, you can check out this video made in collaboration with Alva Jonathan (@Luckyn00bOC)
You can also find him covering overclocking and tuning in more detail on his YouTube channel here: https://www.youtube.com/@Luckyn00bOC